How to use ESP32 NVS
for persistent storage
What Is NVS
Flash is permanent storage. But writing raw data to flash yourself is complicated and error prone. The ESP32 has a built in system for saving small values to flash without any of that complexity. It is called NVS, Non-Volatile Storage, and the Preferences library is how you use it from Arduino IDE, simplified.
Think of NVS as a small notepad that lives in flash. You write a value to it by name, and it is still there the next time the board boots. Power off, reflash a new sketch, it does not matter. The notepad persists.
When To Use It
NVS is the right tool for small persistent values:
- Settings and configuration that survive a power cycle
- Calibration values set once and kept forever
- A boot counter tracking how many times the board has started
- The last known state of something before power was lost
It is not the right tool for large data or files. For those, LittleFS is covered in the next guide.
The Sketch
A great use case for the NVS partition is a boot counter. The Preferences library ships with the ESP32 Arduino core - no install needed. Upload this and open the serial monitor at 115200 baud. Watch the boot count increment every time you reset the board. Power it off and back on and the count continues from where it left off.
/*
 * We stand on the shoulders of giants when we build
 * with knowledge gained from others' efforts.
 * That doesn't make us giants. Be humble.
 * Create with care. Open source is the way.
 *
 * NVS Boot Counter
 * ----------------
 * Save and increment a boot count using NVS and the Preferences library.
 * The value survives power-off and reflashing.
 *
 * Board:   ESP32 Dev Board
 * Library: Preferences (built-in to ESP32 Arduino core)
 *
 * Open source - MIT Licence
 * Electronic Zoology - field notes from the garage
 * https://electroniczoology.com/guides/how-to-use-esp32-nvs
 */

#include <Preferences.h>
Preferences prefs;

void setup() {
    Serial.begin(115200);
    delay(1000);

    // Open a namespace called "myapp" in read/write mode
    prefs.begin("myapp", false);

    // Read a value, with a default if it does not exist yet
    uint32_t boots = prefs.getUInt("boots", 0);

    // Increment and save it back
    boots++;
    prefs.putUInt("boots", boots);

    Serial.printf("Boot count: %lu\n", (unsigned long)boots);

    // Close the namespace when done
    prefs.end();
}

void loop() {}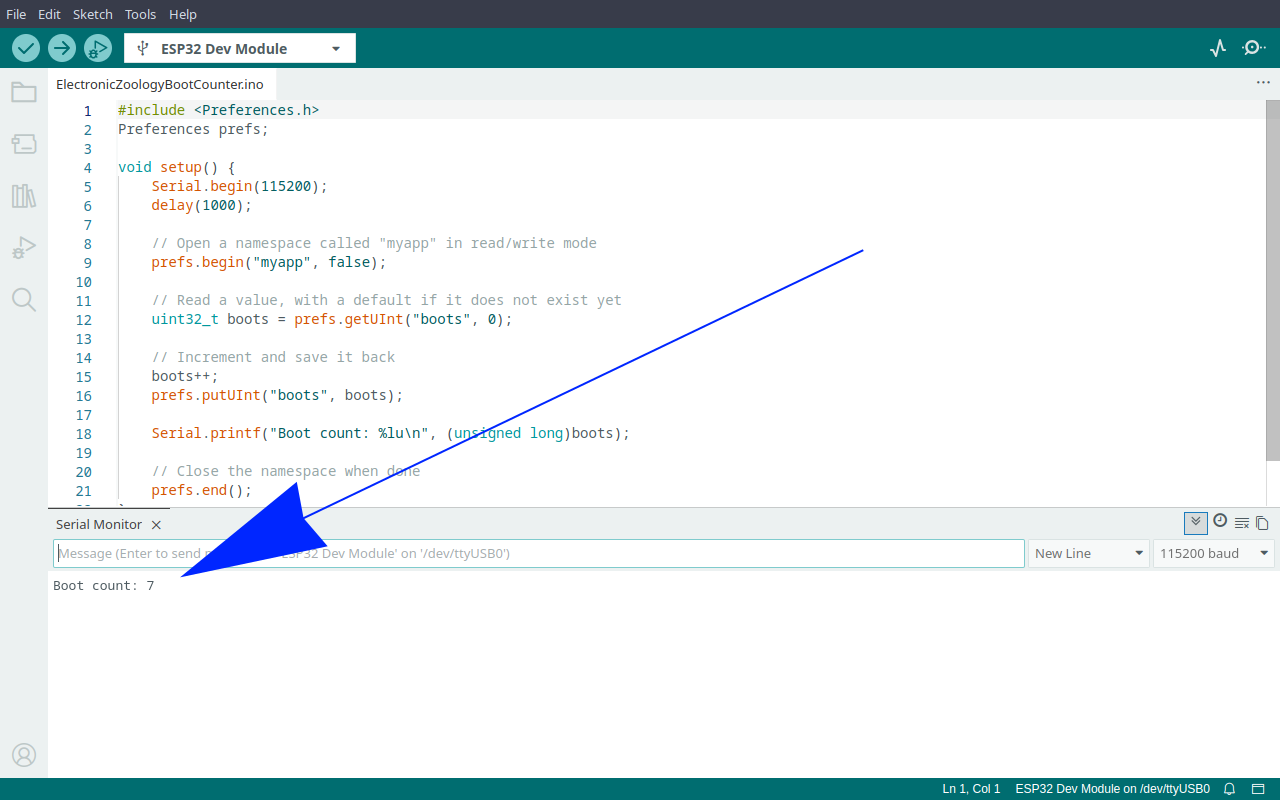
For the counter to keep incrementing across different projects, this code needs to be included in every sketch you flash to the board. If you flash a sketch that does not read and write the boots key, the counter just sits frozen in NVS until a sketch that includes it runs again.
Adding to Your Sketch
The boot counter is five lines in setup. Here is the starfield sketch before and after adding it.
Before
/*
 * We stand on the shoulders of giants when we build
 * with knowledge gained from others' efforts.
 * That doesn't make us giants. Be humble.
 * Create with care. Open source is the way.
 *
 * GC9A01 Round TFT Display - Starfield
 * -------------------------------------
 * Renders a 150-star warp speed starfield on a
 * GC9A01 240x240 round IPS TFT display via SPI.
 *
 * Board:   ESP32 Dev Board
 * Library: Arduino_GFX_Library by Moon On Our Nation
 *
 * Wiring (ESP32 Dev Board):
 *   VCC -> 3.3V    GND -> GND
 *   SCL -> GPIO18  SDA -> GPIO23
 *   DC  -> GPIO27  CS  -> GPIO5
 *   RST -> GPIO4
 *
 * Open source - MIT Licence
 * Electronic Zoology - field notes from the garage
 * https://electroniczoology.com/guides/how-to-use-esp32-nvs
 */

#include <Arduino_GFX_Library.h>

// ESP32 Dev Board pins
#define TFT_DC  27
#define TFT_CS   5
#define TFT_RST  4
#define TFT_SCK 18
#define TFT_MOSI 23

Arduino_DataBus *bus = new Arduino_HWSPI(TFT_DC, TFT_CS, TFT_SCK, TFT_MOSI);
Arduino_GFX *gfx = new Arduino_GC9A01(bus, TFT_RST, 0, true);

#define CX        120
#define CY        120
#define NUM_STARS 150
#define SPEED     3.5f

struct Star { float x, y, z; int px, py; };
Star stars[NUM_STARS];

void resetStar(Star &s) {
  s.x = random(-120, 120);
  s.y = random(-120, 120);
  s.z = random(60, 240);
  s.px = -1; s.py = -1;
}

uint16_t grey(uint8_t v) {
  return ((v >> 3) << 11) | ((v >> 2) << 5) | (v >> 3);
}

void drawTitle() {
  gfx->setTextColor(0xFFFF);
  gfx->setTextSize(2);
  gfx->setCursor(60, 100); gfx->print("Electronic");
  gfx->setCursor(54, 122); gfx->print("Zoology.com");
}

void setup() {
  pinMode(4, OUTPUT);
  digitalWrite(4, LOW);
  Serial.begin(115200);
  randomSeed(analogRead(0));
  gfx->begin();
  gfx->fillScreen(0x0000);
  for (int i = 0; i < NUM_STARS; i++) {
    resetStar(stars[i]);
    stars[i].z = random(1, 240);
  }
}

void loop() {
  for (int i = 0; i < NUM_STARS; i++) {
    Star &s = stars[i];
    if (s.px >= 0) gfx->fillCircle(s.px, s.py, s.z > 120 ? 1 : 2, 0x0000);
    s.z -= SPEED;
    if (s.z <= 1) { resetStar(s); continue; }
    int sx = CX + (int)(s.x * 120.0f / s.z);
    int sy = CY + (int)(s.y * 120.0f / s.z);
    if (sx < 0 || sx >= 240 || sy < 0 || sy >= 240) { resetStar(s); continue; }
    uint8_t brightness = (uint8_t)((1.0f - s.z / 240.0f) * 220 + 35);
    int radius = s.z < 80 ? 2 : 1;
    gfx->fillCircle(sx, sy, radius, grey(brightness));
    s.px = sx; s.py = sy;
  }
  drawTitle();
}After - boot counter added
/*
 * We stand on the shoulders of giants when we build
 * with knowledge gained from others' efforts.
 * That doesn't make us giants. Be humble.
 * Create with care. Open source is the way.
 *
 * GC9A01 Round TFT Display - Starfield with Boot Counter
 * -------------------------------------------------------
 * Starfield animation with an NVS boot counter added.
 * The count survives power-off and reflashing.
 *
 * Board:   ESP32 Dev Board
 * Library: Arduino_GFX_Library by Moon On Our Nation
 *          Preferences (built into ESP32 Arduino core)
 *
 * Wiring (ESP32 Dev Board):
 *   VCC -> 3.3V    GND -> GND
 *   SCL -> GPIO18  SDA -> GPIO23
 *   DC  -> GPIO27  CS  -> GPIO5
 *   RST -> GPIO4
 *
 * Open source - MIT Licence
 * Electronic Zoology - field notes from the garage
 * https://electroniczoology.com/guides/how-to-use-esp32-nvs
 */

#include <Arduino_GFX_Library.h>
#include <Preferences.h>

// ESP32 Dev Board pins
#define TFT_DC  27
#define TFT_CS   5
#define TFT_RST  4
#define TFT_SCK 18
#define TFT_MOSI 23

Arduino_DataBus *bus = new Arduino_HWSPI(TFT_DC, TFT_CS, TFT_SCK, TFT_MOSI);
Arduino_GFX *gfx = new Arduino_GC9A01(bus, TFT_RST, 0, true);

#define CX        120
#define CY        120
#define NUM_STARS 150
#define SPEED     3.5f

struct Star { float x, y, z; int px, py; };
Star stars[NUM_STARS];

void resetStar(Star &s) {
  s.x = random(-120, 120);
  s.y = random(-120, 120);
  s.z = random(60, 240);
  s.px = -1; s.py = -1;
}

uint16_t grey(uint8_t v) {
  return ((v >> 3) << 11) | ((v >> 2) << 5) | (v >> 3);
}

void drawTitle() {
  gfx->setTextColor(0xFFFF);
  gfx->setTextSize(2);
  gfx->setCursor(60, 100); gfx->print("Electronic");
  gfx->setCursor(54, 122); gfx->print("Zoology.com");
}

void setup() {
  pinMode(4, OUTPUT);
  digitalWrite(4, LOW);
  Serial.begin(115200);
  delay(1000);

  Preferences prefs;
  prefs.begin("myapp", false);
  uint32_t boots = prefs.getUInt("boots", 0);
  boots++;
  prefs.putUInt("boots", boots);
  Serial.printf("Boot count: %lu\n", (unsigned long)boots);
  prefs.end();

  randomSeed(analogRead(0));
  gfx->begin();
  gfx->fillScreen(0x0000);
  for (int i = 0; i < NUM_STARS; i++) {
    resetStar(stars[i]);
    stars[i].z = random(1, 240);
  }
}

void loop() {
  for (int i = 0; i < NUM_STARS; i++) {
    Star &s = stars[i];
    if (s.px >= 0) gfx->fillCircle(s.px, s.py, s.z > 120 ? 1 : 2, 0x0000);
    s.z -= SPEED;
    if (s.z <= 1) { resetStar(s); continue; }
    int sx = CX + (int)(s.x * 120.0f / s.z);
    int sy = CY + (int)(s.y * 120.0f / s.z);
    if (sx < 0 || sx >= 240 || sy < 0 || sy >= 240) { resetStar(s); continue; }
    uint8_t brightness = (uint8_t)((1.0f - s.z / 240.0f) * 220 + 35);
    int radius = s.z < 80 ? 2 : 1;
    gfx->fillCircle(sx, sy, radius, grey(brightness));
    s.px = sx; s.py = sy;
  }
  drawTitle();
}The count prints to the serial monitor on every boot and survives every power cycle and reflash. For fuller tracking - total uptime, a history of every project ever flashed to the board - see How to log ESP32 boot count and uptime with LittleFS.
Namespaces
NVS organises values into namespaces - a label that groups related values together. Different sketches or different parts of your code can use different namespaces without stepping on each other.
Because NVS persists across reflashing, if two sketches use the same namespace and the same key name the second sketch will pick up the value left by the first. This is usually fine and occasionally very useful, but worth knowing. If you want a clean slate for a new project, use a different namespace name or explicitly clear the old one:
prefs.begin("myapp", false);
prefs.clear(); // wipes everything in this namespace
prefs.end();Available Data Types
The Preferences library supports most common types. The second argument to each get function is the default returned if the key does not exist yet.
prefs.putBool("flag", true);
prefs.putInt("count", 42);
prefs.putFloat("temp", 23.5);
prefs.putString("name", "myboard");

bool flag   = prefs.getBool("flag", false);
int count   = prefs.getInt("count", 0);
float temp  = prefs.getFloat("temp", 0.0);
String name = prefs.getString("name", "unknown");NVS and the Flash Budget
NVS lives in its own dedicated partition in flash, separate from your sketch partition and your LittleFS partition. It is small by design - typically 20KB in most partition schemes - because it is only meant for small values. Do not try to store large data in NVS. That is what LittleFS is for - see How to use LittleFS on ESP32 →